Our practice has managed to grow from basically zero implants to more than many surgeons in our area. How have we done this? The answer is pretty simple – I have travelled an implant journey.
What do I mean by this? Basically in the beginning I chose only ‘slam dunk’ cases. Then I moved to multiple implants. Then I moved to anterior implants. Then I moved to immediate implants. Then I learned to do implant grafting (sinus bumps, lateral wall, etc). Then we moved into full arch type of cases.
This journey has taken about 7 years so far. I’ve made mistakes along the way and have learned a ton. The greatest achievement is being able to share my journey with each of you. The journey isn’t over and will never be over.
Today our practice embarked on a new implant journey – orthodontic implants or TADs. Temporary Anchorage Device.
When patients have been missing teeth for an extended period of time, there is a tendency for tooth movement. This super eruption can leave you with limited occlusal clearance and make implant restoration nearly impossible.
Benny came to our office with several goals. First, he wanted an implant to replace his missing front tooth. Then he wanted to replace the missing teeth on the lower right. This was a plan that would take several years due to finances and other dental issues going on.

His front tooth was pretty simple to take care of. By the time we got around to the lower right (about 2 years after the front tooth) there was even more eruption than we see above. So much so that restoration would be difficult and certainly compromised occlusal pattern.
In the past I would refer the patient to an orthodontic specialist to correct this. Unfortunately, most patients weren’t willing to embrace the additional cost and/or time establishing another relationship. So the case would go untreated.
So I finally decided it was time to utilize TADs to intrude teeth myself during the integration period of his lower implants.
Benny is a perfect example of some advanced skills that an implant dentist should have to add more cases. His lower jaw needs lateral grafting and he also needs TADs in the upper jaw for intrusion. 90% of general dentists in the USA would not tackle this case. I would venture to guess that half of the remaining 10% would not tackle this case due to the grafting and TADs.
To go from dabbling in implant to doing a significant number of implants – you must constantly add more skills to your tool belt.
Here is a picture of Benny’s lower right mandible.

In our office nearly every case utilizes 3D virtual planning and a surgical guide. Benny’s virtual planning confirmed the need for lateral grafting. Based on the amount necessary we felt that simultaneous grafting at time of implant placement was predictable.
The area was reflected with a full thickness flap and guided osteotomies completed.


The lateral walls were enhanced with ‘dimples’ to decorticate and create bleeding points to help better integrate the graft material. Then the implants were guided into position.

As expected, a few lateral threads were exposed due to the buccal ridge width deficiency. The site was then augmented with particulate bone allograft.

The site was then closed and primary closure was achieved.
Now we are ready to proceed to the placement of the orthodontic TADs. Based on recommendations from my orthodontic colleagues, I selected the Vector system from Ormco.
My decision for this system was based first on the trust and reference from my orthodontic specialists. Secondly and just as important they had a local representative who was willing to work with me.

Like traditional implants, TADs come packed in a sterile tube.

However, unlike traditional implants they don’t require any type of pilot osteotomy. The implant was removed from the carrier and placed directly on to the TAD driver.

Many have said you can do this without anesthetic – utilizing just topical – but I am not afraid of needles so i gave the patient a little infiltration.
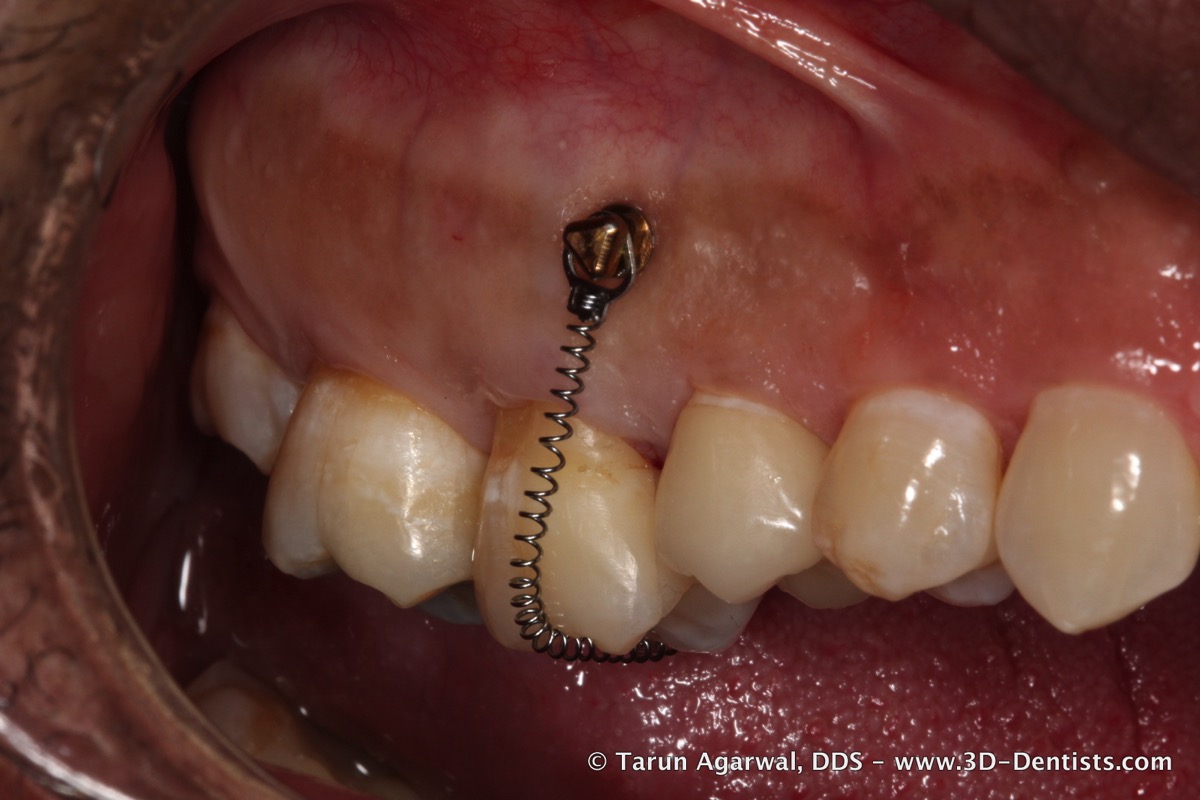
The TAD was then hand driven into position.


A second TAD was placed on the palate and then a spring was connected to both TADs.

I have to be honest – this was much simpler than I expected. I hope to provide a follow up post with my experience and the results of this case in a few months.
Please note – my patient was informed that this was my first TAD case and he was quite happy to be a ‘teaching case’.