Ok I get it. Single Centrals are hard and to attempt them with Cerec they could get tricky. There is a lot that needs to be taken into Consideration : Material Choice,Stump Shade, Restorative thickness, Line angles, Incisal embrasures, Facial anatomy, Texturing , Stains.
I believe it all starts with photography. Taking good quality pictures is a must for anterior Cerec work as it helps not only in planning but also in executing the case well. Pre-operative pictures viewed on a large screen gives you a lot of information that looking in the mouth will never be able to provide.
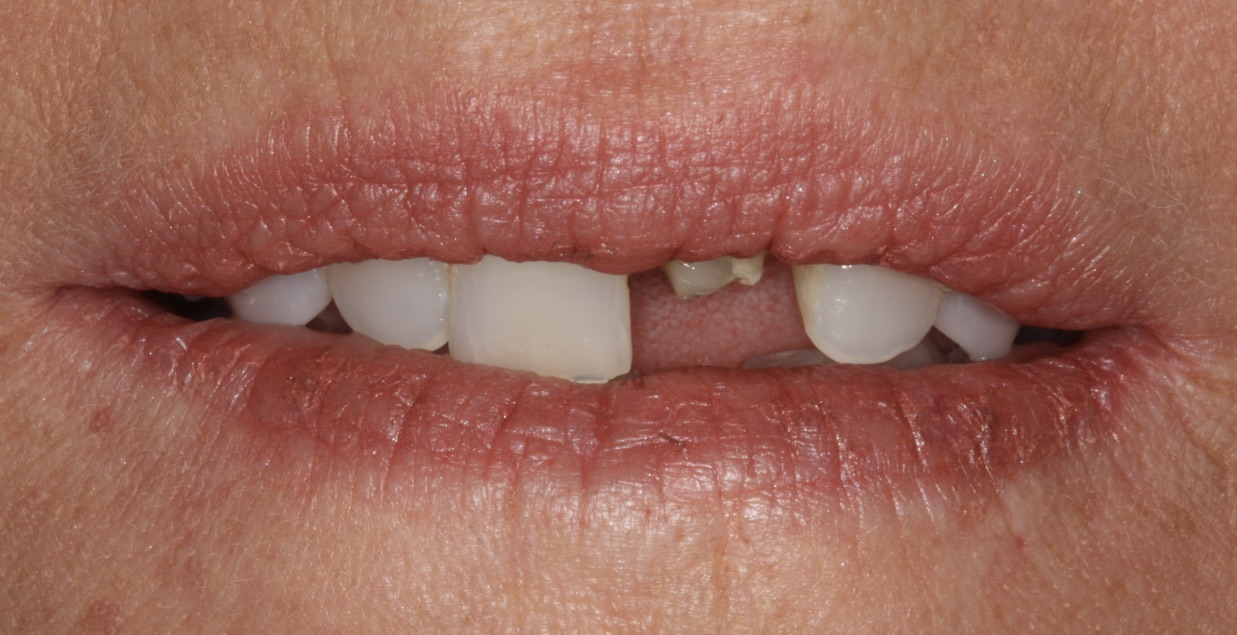
Here is a patient that came to see me just around the holiday season as she lost her crown on tooth #9 . Pre-operative pictures were taken and mounted on a large screen for the patient and me to view. I asked her what she didn’t like about her smile other than the missing crown and she immediately told me about the chipped incisal edge of #8.


This gave me the opportunity to talk to her about her options to treat that. After going over several options we decided on doing some enameloplasty to smooth out the edges and make the incisal edge more harmonious.
After that a build up was done with packable composite and the case was scanned with the Cerec SW 4.5.2 on the Omnicam. Biogeneric Reference was used to design the restoration as patient was happy with the shape , size and form of tooth #8.


Emax MT Shade A1 was chosen as the restorative material as there was about .8mm clearance on the lingual and I felt that Emax gave me the strongest material option. The crown was milled and tried in. Tooth #8 was used as a reference and shape and line angles were further dialed in at this time.

Next the crown was crystallized without any stain or glaze so that the base shade could be verified in the mouth. The crown after crystallization was tried in and a picture was taken and evaluated on a larger screen. I found the shade to be acceptable but there were some key elements missing. I was missing some translucency on the line angles and some chroma on the middle of the incisal edge on the facial and so I used a mixture of I1( Blue ) and I2 ( Purple ) to apply on the mesial and distal line angles and Stain 1 on the facial surface to match it to #8.

After the 2nd fire the crown was tried in and again the picture was shown to the patient and she was very happy with the final result.

The patient came back for a 2 week post op check up to evaluate the health of the gingiva and see if any changes were needed. I usually tell patient to make a note of things that they may want to modify at that appointment. Again pictures were taken and viewed along with the patient. This time the pictures were taken with a twin flash compared to the pictures on the day of the appointment which were taken with a ring flash. I find that the twin flash works better for anterior work .At this time patient pointed out that she really liked the rounded disto-incisal edge of # 9 and asked me if I could replicate that to # 8.

I agreed with her assessment and did a slight modification to the disto-incisal edge of #8 and that made it look a little more softer and feminine. The patient was thrilled with the final result and complimented me on a job well done. She mentioned how she had never had a dentist use photography for her dentistry in the past and mentioned that the pictures and their evaluation played a huge role in achieving the final result.

I would encourage all Cerec users to use digital SLR photography for their anterior work as that will help them achieve better results on their cases and will also help them learn from their mistakes.
Keep Cerecing.
If you would like to learn more on Anterior Cerec join me at my workshop on June 1st and 2nd in Raleigh, North Carolina at 3D Dentists. Click on the link below for more details.
http://tbonespeaks.wpengine.com/cerec-anterior/